Difference between revisions of "Globalscale ESPRESSObin v5"
Jump to navigation
Jump to search
Stephen304 (talk | contribs) (→Files) |
(Added instructions for building the image.) |
||
| Line 10: | Line 10: | ||
[https://downloads.openwrt.org/snapshots/packages/aarch64_cortex-a53/packages/yggdrasil_0.3.5-4_aarch64_cortex-a53.ipk Yggdrasil 0.5.3 Package] | [https://downloads.openwrt.org/snapshots/packages/aarch64_cortex-a53/packages/yggdrasil_0.3.5-4_aarch64_cortex-a53.ipk Yggdrasil 0.5.3 Package] | ||
| + | |||
| + | == Build The Image == | ||
| + | |||
| + | First, you will need to grab the [meta-imagebuilder](https://github.com/massmesh/meta-imagebuilder) repository. This repository has a script in it that builds pre-configured OpenWRT images. | ||
| + | |||
| + | <pre>git clone https://github.com/massmesh/meta-imagebuilder</pre> | ||
| + | |||
| + | Next, build the image using the `build` script. | ||
| + | |||
| + | <pre>cd meta-imagebuilder | ||
| + | ./build massmesh meshnode espressobin</pre> | ||
| + | |||
| + | You now should see `.img.gz` files when you run | ||
| + | |||
| + | <pre>ls ./communities/massmesh/meshnode/bin/espressobin/</pre> | ||
== Flashing == | == Flashing == | ||
Revision as of 22:22, 13 June 2019
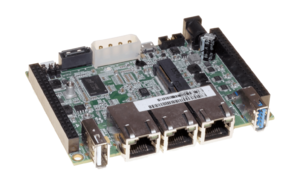
The ESPRESSObin v5 is a small single board computer similar to a raspberry pi. It has 3 ethernet ports, a USB 3.0 port, as well as an internal mPCIe slot.
Files
Build The Image
First, you will need to grab the [meta-imagebuilder](https://github.com/massmesh/meta-imagebuilder) repository. This repository has a script in it that builds pre-configured OpenWRT images.
git clone https://github.com/massmesh/meta-imagebuilder
Next, build the image using the `build` script.
cd meta-imagebuilder
./build massmesh meshnode espressobin
You now should see `.img.gz` files when you run
ls ./communities/massmesh/meshnode/bin/espressobin/
Flashing
- Write
openwrt-18.06.2-mvebu-cortexa53-globalscale-espressobin-squashfs-sdcard.img.gzto a microsd card using the following command: - Run
syncbefore removing the sd card - Insert the sd card into the ESPRESSObin and power it on
zcat ~/Downloads/openwrt-18.06.2-mvebu-cortexa53-globalscale-espressobin-squashfs-sdcard.img.gz | sudo dd of=/dev/mmcblk0
